Wall Hacks
- santosh nalla
- Nov 17, 2021
- 7 min read
Updated: Nov 21, 2021
The main objective of this blog is, to make an object visible through walls(to be able to see the object no matter what is in between the object and the camera) using shaders.
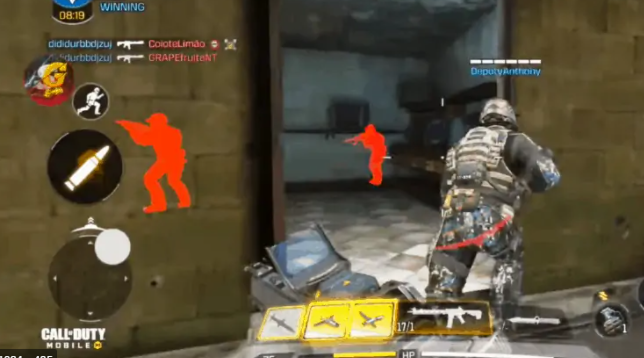
As shown in the above picture, the enemies are rendered/displayed even when then are behind an object.
This effect can be achieved using a shader effect.
In this blog I am gonna discuss 2 common ways to achieve similar effects in games
EFFECT ONE:
This effect looks something like this.
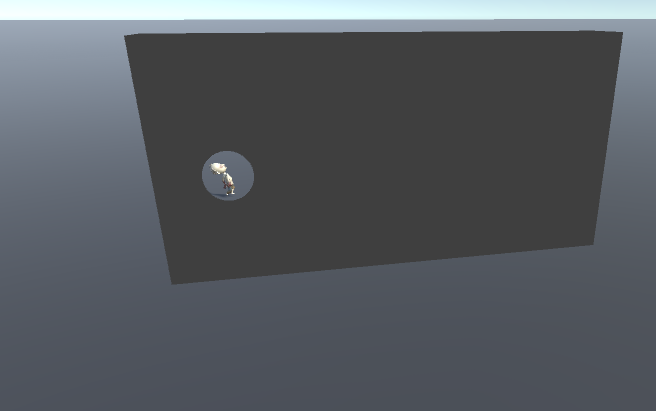
The zombie is behind the wall, but can still see zombie getting rendered. A hole effect is created and the zombie is visible through the hole .
This hole is created using simple shader code.
We use stencil buffer for this.
So what is a stencil buffer and how can we use stencil buffer to achieve this kind of effect?
In Unity, you can use a stencil buffer to flag pixels, and then only render pixels that pass the stencil operation.
The shader which will read from the stencil buffer will draw itself, but only where the buffer has a specific value, everywhere else it will be discarded.
All stencil operations are done via a small stencil code block outside of our HLSL code. We can write them in our subshader to use them for the whole subshader or in the shader pass to use them only in that one shader pass.
So how can we achieve the above effect using stencil buffer?
Firstly, attach the character(zombie) with a simple sphere(hole shape created). Using a simple shader code which is attached to this sphere, we will fill the stencil buffer with value "1" where ever the sphere is rendered on the screen and rest of the pixels are marked 0.
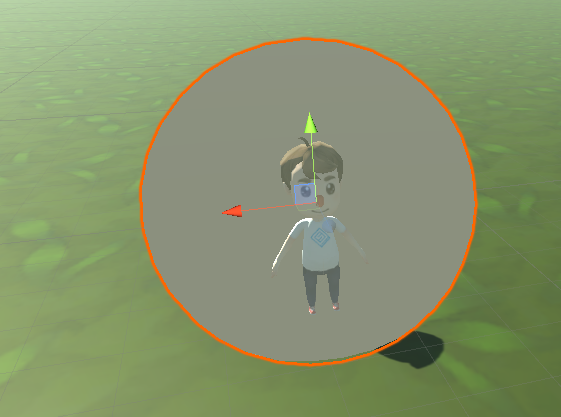
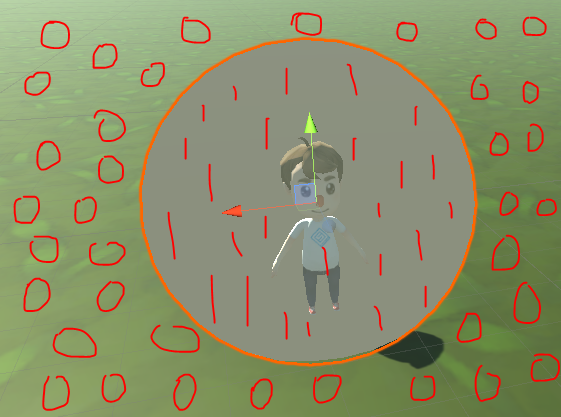
Now, attach an another simple shader script to wall, in which we render wall pixels only when the stencil buffer value(which is earlier filled by the sphere) at that particular pixel is 0.
Using these 2 steps, we are only rendering wall pixels at places where the sphere is not present. This way we create holes in the wall.
Creating hole in the wall is like "not rendering pixels of the wall at that particular positions where you want to create hole".
Lets write the actual shader code now.
For the sphere, as I have already mentioned, we should fill stencil buffer with value 1 where ever sphere pixels are rendered on the screen(as shown by the above picture).
Stencil
{
   Ref 1
   comp always
   Pass replace
}
this fills the stencil buffer with value 1 always. When we attach this to sphere, where sphere pixels are rendered, stencil buffer is filled with 1 always.
Ref 1 - is what value to fill in the stencil buffer
comp always - says to fill on to stencil buffer with value 1 always(at all sphere pixels)
Pass replace - this is where the actual replacement of the stencil buffer value with value 1(Ref value) takes place.
Pseudo code for the above statement can be written as:
for(i = for all pixels rendered by sphere)
{
  stencilBuffer[i] = 1;
}
Now the complete sphere shader code will look like:
Shader "ShaderLearning/Sphere"
{
	Properties
	{
		_Color("Main Color", Color) = (1,1,1,1)
		_Texture("Basic Texture", 2D) = "white" {}
	}


		Subshader
	{
		Blend SrcAlpha OneMinusSrcAlpha
		  Pass
			{
				ZWrite on
				Stencil
				{
				   Ref 1
				   comp always
				   Pass replace
				}


				CGPROGRAM
				 #pragma vertex vert
				 #pragma fragment frag

				uniform half4 _Color;
	            uniform sampler2D _Texture;
				uniform float4 _Texture_ST;
				struct vertexInput
				{
					float4 vertex: POSITION;
					float4 texcoorda: TEXCOORD0;
				};

				struct vertexOutput
				{
					float4 pos : SV_POSITION;
					float4 texcoorda: TEXCOORD0;
				};

				vertexOutput vert(vertexInput v)
				{
					vertexOutput o;
					o.pos = UnityObjectToClipPos(v.vertex);
					o.texcoorda.xy = v.texcoorda + _Texture_ST.wz;
					return o;
				}


				half4 frag(vertexOutput i) : COLOR
				{
					return tex2D(_Texture,i.texcoorda) * _Color.rgba;
				}

			   ENDCG
		   }

	}
}
Blend SrcAlpha OneMinusSrcAlpha - makes the sphere transparent when you reduce alpha to 0 for the sphere.
Now coming back to the wall shader code, as I have already mentioned, we render wall pixels only when the stencil buffer value(which is earlier filled by the sphere) at that particular pixel is 0.
Stencil
  {
     Ref 1
     comp notEqual
  }
We write these lines inside the pass where we render the wall.
comp notEqual tell us that, execute the pass only when the value in the stencil buffer is not equal to 1. If the value in the stencil buffer is 1, DONOT execute the pass{}.
Pass{} renders the wall pixels. When we ignore pass{} execution, we are not rendering pixels are that particular position, creating a hole.
Pseudo code for the above statement can be written as:
for(i = for all pixels rendered by wall)
{
  if(stencilBuffer[i] != 1)
     {
         Pass{........// Wall render Code}
     }
}
The complete shader code which is attached to the wall:
Shader "ShaderLearning/Wall"
{
	Properties
	{
		_Color("Main Color", Color) = (1,1,1,1)
		_Texture("Basic Texture", 2D) = "white" {}
	}


		Subshader
	{
		Blend SrcAlpha OneMinusSrcAlpha
		  Pass
			{
				Stencil
				{
					Ref 1
					comp notEqual
				}


				CGPROGRAM
				 #pragma vertex vert
				 #pragma fragment frag

				uniform half4 _Color;
	            uniform sampler2D _Texture;
				uniform float4 _Texture_ST;
				struct vertexInput
				{
					float4 vertex: POSITION;
					float4 texcoorda: TEXCOORD0;
				};

				struct vertexOutput
				{
					float4 pos : SV_POSITION;
					float4 texcoorda: TEXCOORD0;
				};

				vertexOutput vert(vertexInput v)
				{
					vertexOutput o;
					o.pos = UnityObjectToClipPos(v.vertex);
					o.texcoorda.xy = v.texcoorda + _Texture_ST.wz;
					return o;
				}


				half4 frag(vertexOutput i) : COLOR
				{
					return tex2D(_Texture,i.texcoorda) * _Color.rgba;
				}

			   ENDCG
		   }

	}
}
we were able to achieve this using stencil buffer inside a pass.
There are some points to be noted here for stencil buffer:
Stencil Buffer can take values between 0 to 255.
The default value in stencil buffer is 0. So all the pixels by default in stencil buffer has 0 filled up.
Render pipeline in Unity goes like : Ztest -> Blending -> Stencil Test -> Color Mask.... so stencil test comes in between Blending and Color Mask.
Now lets move on to effect 2.
EFFECT TWO
Now another effect you see when a player/enemy goes behind the wall is, they get a color or an outline.
This is the most common effect you see in games.
You can see when this zombie went behind the wall, it is still rendered but with a different pass/Shader code.
This can also be achieved using stencil buffer and ZTest.
In effect 1, I have already explained how stencil buffer works.
Let me brief you how Ztest works!!!
Image 2 cubes, A (Green Cube)and B(Red Cube). A is half the size of B and is behind B. In 3d world, as A is behind B, A is not visible. You can only see B cube on your screen(unless you don't change view angle). Why is this? Because the ZTest for every pixel failed for A, hence it is not rendered on the screen. Ztest is the z distance between camera and object. So farthest object is rendered first and is overridden when ever you have an object whose distance is less than the previous.
In the above case, as z distance from camera for A is greater than B's distance from camera, so A is not rendered. This distance is not calculated for object as whole, but for every pixel covered for that object. This is Ztest which happens in render pipeline.
Now the thing to note here is, we can switch off the ZTest and stop the pipeline to perform Ztest -- that is we can bypass ZTest and force it to true(pass) always.
In the above case, if you switch off Ztest for green-A cube in its shader code, you can see both cubes A and B in what ever angle you see.
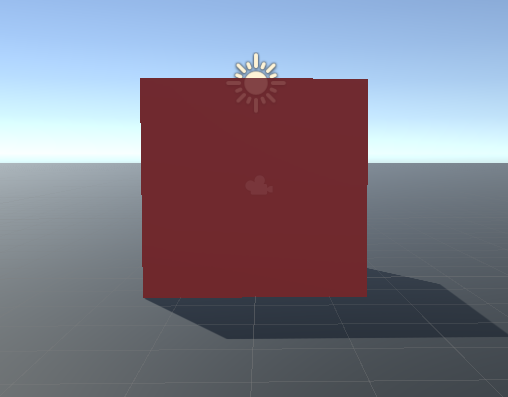
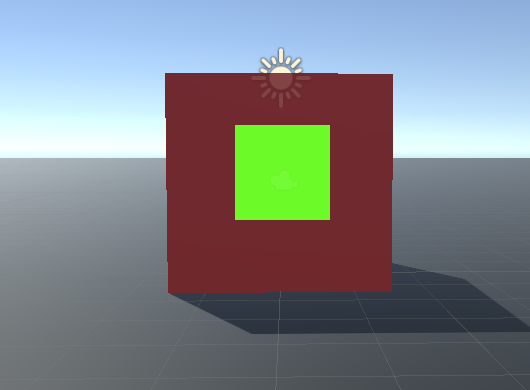
In the first picture, Ztest is performed on green cube, so it is not rendered on the screen as if failed ZTest.
In the 2nd picture, I wrote "ZTest Always", which tells the shader code to pass ZTest and render the pixel no matter what the Z distance is, So ZTest is not performs(Passes always).
Now coming back to effect 2, to render zombie we use 2 passes and 2 stencils.
Let me write the Pseudo code first,
for(i => run through all zombie pixels)
{
    if(pixel[i] Fail ZTest)
      {
             StencilBuffer[i] = 0
      }
    else
     {
            StencilBuffer[i] = 1
     }

     Pass
     {
            //Use can use Standard Shader here. Regular Render.
     }
}

for(i => run through all zombie pixels)
{
     if(StencilBuffer[i] == 0)
     {
            Pass
             {
                    ZTest Always
                   //Render it with Red Color as shown in the above picture
             }
     }
}
So i used 2 passes, one with a normal unlit/Standard shader with zombie texture and 2nd with a red color output shader.
In the first pass, I render entire zombie with a standard shader effect and for what ever pixels fail Ztest I am filling stencil buffer with 0 and rest with 1.
 Stencil
  {
    Ref 1
    Comp always
    Pass replace
    ZFail keep //What ever pixels fail ZTest, replace 1 with 0(default)
  }
In the second pass, I read stencil buffer values, and only for those pixels with stencil buffer value 0(those pixels which failed ZTest) i am bypassing Ztest(ZTest Always) and Rendering those with red color. Bypassing Ztest will display zombie on top of the every object as explained above.
So the when the parts of zombie/or zombie as a whole goes behind the wall, ZTest for that pixel fails, and they are displayed with red color.
Here is the code for the zombie:
Shader "SanShaders/BasicUnlit_WallDetection_Shader"
{
	Properties
	{
		_Color("Behind the Wall Color", Color) = (1,1,1,1)
		_MainTex ("Main Texture", 2D) = "white" {}
	}


		Subshader
	{
		  Pass
        {
            Stencil
			{
				  Ref 1
				  Comp always
				  Pass replace
				  ZFail keep
            }
            CGPROGRAM
            #pragma vertex vert
            #pragma fragment frag
            // make fog work
            #pragma multi_compile_fog

            #include "UnityCG.cginc"

            struct appdata
            {
                float4 vertex : POSITION;
                float2 uv : TEXCOORD0;
            };

            struct v2f
            {
                float2 uv : TEXCOORD0;
                UNITY_FOG_COORDS(1)
                float4 vertex : SV_POSITION;
            };

            sampler2D _MainTex;
            float4 _MainTex_ST;

            v2f vert (appdata v)
            {
                v2f o;
                o.vertex = UnityObjectToClipPos(v.vertex);
                o.uv = TRANSFORM_TEX(v.uv, _MainTex);
                UNITY_TRANSFER_FOG(o,o.vertex);
                return o;
            }

            fixed4 frag (v2f i) : SV_Target
            {
                // sample the texture
                fixed4 col = tex2D(_MainTex, i.uv);
                // apply fog
                UNITY_APPLY_FOG(i.fogCoord, col);
                return col;
            }
            ENDCG
        }


       Pass{
                         ZWrite on
			 ZTest Always
			 Blend SrcAlpha OneMinusSrcAlpha

				Stencil {
				  Ref 1
				  Comp NotEqual
				}

				//Give shader which you want to display behind the wall!!
				CGPROGRAM
					 #pragma vertex vert
					 #pragma fragment frag

				    uniform half4 _Color;
					struct vertexInput
					{
						float4 vertex: POSITION;
					};

					struct vertexOutput
					{
						float4 pos : SV_POSITION;
					};

			vertexOutput vert(vertexInput v)
			{
				vertexOutput o;
				o.pos = UnityObjectToClipPos(v.vertex);
				return o;
			}


			half4 frag(vertexOutput i) : COLOR
			{
				return _Color;
			}

			   ENDCG
		   }
	}
}
Code in blue is regular zombie shader and Code in red is the shader code which is executed for pixels behind the wall.
I am posting a video here to show exactly how the above 2 effects works.


Comments