Inverse Kinematics in Unity(IK)
- santosh nalla
- May 23, 2020
- 3 min read
This is my second blog on Unity Animation. In my first blog I have clearly explained how Animation works in unity and different options we have under Animations in Unity.
Inverse Kinematics is an interesting feature in the animation world. Before defining what inverse kinematics is, let's understand about bones in animations.
To set up animations for a character, we give bones to it, apply the skin on top of those bones, and move those bones to animate a character( just like how God created us :p). In very simple terms attaching skin to bones is called rigging. "Attaching" means skin moves along with the bones. Now that you have understood rigging, there are 2 ways in which you can move these bones:
Forward Kinematics
Inverse Kinematics
Inverse Kinematics: Inverse Kinematics is a goal-oriented way of animating. You move the effector (end) of a chain in place and Softimage calculates the angles at which the previous joints in the chain must rotate for the bone or end of the chain to reach its goal. This process is called solving.
IK is an intuitive way of animating because it’s how you traditionally think of movement. For example, when you want to grab an apple, you think about moving your hand to the apple (goal-oriented).
In IK, you can also mention up to what bone in the chain that the effect should persist.
Forward Kinematics: Forward kinematics allows for complete control of the chain’s behavior because you rotate each joint’s position. Only the angle of the selected joint is affected; all other joint angles are preserved. Positioning a skeleton’s hand to grab an apple means rotating each joint in the arm, from the shoulder to the wrist and fingers.
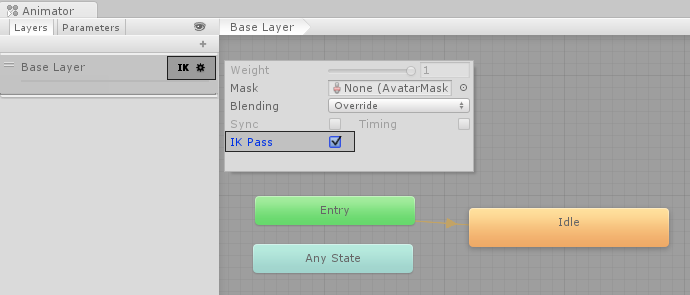
In Unity to activate Inverse Kinematics, you must check the "IK Pass" checkbox. This is the first and most basic step to do before you start to take control of the IK motion of your character.

Let me show you how IK can be useful in Unity. Watch the below video first.
Here in this video you can see our player hand is following the object. The hand is using the feature "Inverse Kinematics" to follow the red object. You can also see the character is looking at that same object as we move. Even this is happening using "Inverse Kinematics"
1. First thing as i have already mentioned, we need to check "IK Pass" in the animation window for the base layer( or layer you are working on)
2. Now that you have checked the IK pass, you have access to the function
private void OnAnimatorIK(int layerIndex) which is like an update which executes for every frame.
3. What ever we want to achieve using IK, we need to write inside this function which i have mentioned above.
4. Now our goal is to move right hand to the objects position. Firstly we need to set the weight of our right hand. IK Weight is the amount that the IKwill affect the animation.
_animator.SetIKPositionWeight(AvatarIKGoal.RightHand, 1.0f);note: _animation is the animator which is attached to the character.
5. Now that we gave weight to our righ hand IK movement , now its time to make our right hand follow our object.
_animator.SetIKPosition(AvatarIKGoal.RightHand, sphere.transform.position);AvtarIKGoal is a class which is used to set and get IK weights, position and rotation.
It has 4 properties: LeftHand , RightHand , LeftFoot, RightFoot.
6.For the head to look at the object, we need to set the Look at position for the head.
note: Don't forget to set up weight.
_animator.SetLookAtPosition(sphere.transform.position); _animator.SetLookAtWeight(1);FULL CODE:
 public GameObject sphere; //To follow
 private void Start()
    {
        _animator = GetComponent<Animator>();
    }
    private void OnAnimatorIK(int layerIndex)
    {
        _animator.SetIKPosition(AvatarIKGoal.RightHand, sphere.transform.position);
        _animator.SetIKPositionWeight(AvatarIKGoal.RightHand, 1.0f);
        _animator.SetLookAtPosition(sphere.transform.position);
        _animator.SetLookAtWeight(1);
    }


Comments